
You’ve heard all about the standard issue HP MediaSmart Server, which is by all accounts a great little machine. You’ve been shown how to create a low cost, low power DIY $400 Windows Home Server. You’ve even seen a Windows Home Server build out of a chrome toaster.
So what’s next on the WHS horizon?
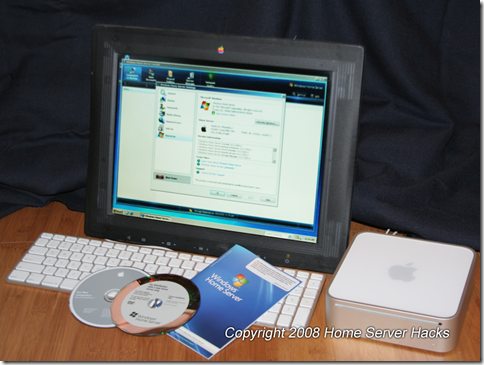
The big news expected to be announced today by Steve Jobs at the Apple Worldwide Developers Conference (WWDC) (running June 9-13 in San Francisco) is not the 3G iPhone. Not a new OS, code named Snow Leopard. It’s Apple’s all new iHomeServer.1 This device is Apple’s first non OS X based Intel computer (it comes with Microsoft’s Windows Home Server) and is built around the compact yet powerful Mac Mini.
The iHomeServer is slated to be released: never.
Obviously, there is no such appliance coming from Apple. You can however build your own (seriously).
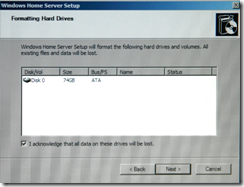
In this article, I’ll take you through how it’s done, step by step. Be aware that this will completely wipe out your OS X partition. That is to say that you will no longer have a cutesy little Mac OS. You will have an honest to goodness Windows Home Server installed on a single partition.
Note that you DON’T need to install Boot Camp. However, we will be using the Windows Drivers CD that comes with Boot Camp.
If you’re ok with that then let’s get started!
- Get yourself a Mac Mini. I used a brand new Intel 1.83GHz Core 2 Duo with Leopard, which means that it has the latest firmware and the Windows drivers on DVD. If you use an older version, you will need to download Boot Camp in order to update the firmware and create a drivers CD.
- Hook up a monitor, keyboard, mouse, power adapter and network cable. You won’t need the monitor, keyboard and mouse after installation so you can borrow these from another PC temporarily.
- Press the power button on the back of the Mac.
- Quickly insert the Windows Home Server installation DVD. I say “quickly” because you want it to boot from the DVD before Mac OS is allowed to boot up.
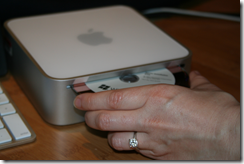
- When you hear the Mac startup sound, press and hold the letter “C” on the keyboard to boot from DVD.
- If you don’t get the DVD inserted or type “C” immediately after you hear the Mac startup sound, no worries. Just power down and try again.
- If all went according to plan, you should see standard the WHS installation screens.
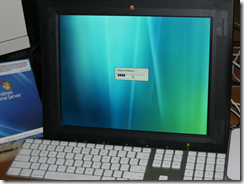
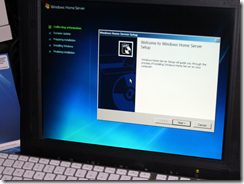
- After a few clicks you will see the following dialog stating the partition that will be lost. You are now at the point of no return and are about to completely wipe out your OS X partition. Come on. Take a leap of faith and click “Next”!
- From this point on, it’s a pretty standard install, so I won’t guide you step-by-step. A full install will take about an hour (but will seem like 4 hours) and the computer will reboot
5,6, 7 times or thereabouts (I lost count after a while). - Eventually, you will see this screen. Click the arrow next to "Welcome".
![image37_thumb[1]](//lh5.ggpht.com/donavon.west/SA1GkXDyT8I/AAAAAAAAAuQ/qm0g2N_BoN4/image37_thumb1_thumb.png?imgmax=800)
- Now enter a password (this will be your Administrator password).
![image40_thumb[1]](//lh3.ggpht.com/donavon.west/SA1Gl3DyT-I/AAAAAAAAAug/vQmjMh62W-s/image40_thumb1_thumb.png?imgmax=800)
- Enter your preferences for the next few screens and you finally will see this message.
![image52_thumb[1]](//lh3.ggpht.com/donavon.west/SA1Gm3DyUAI/AAAAAAAAAuw/LW1TulPVfkc/image52_thumb1_thumb.png?imgmax=800)
- BUT WAIT. Before we can log off, we must install the LAN driver.
- Eject the WHS DVD and insert the Leopard Installation DVD (which contains the Windows drivers). If you are using an older OS, use the CD that you created.
- You may get a message like this, just ignore it by clicking OK and then Finish.
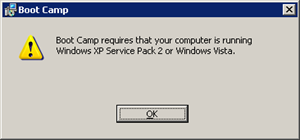
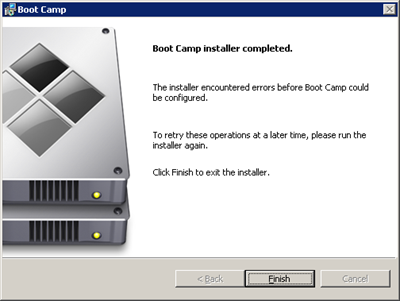
- Navigate to X:\Boot Camp\Drivers\Marvell (on the DVD), double click MarvellXPInstaller.exe and follow the Installation instructions.

- You should now be able to open up Internet Explorer and access the Internet.
- IMPORTANT: At this point remove the Apple Installation DVD or the next time you reboot it will try you to reinstall OS X. Then you would have to start all over again.
- Let’s complete the customization by installing an Apple logo on our WHS Console.
- Click here to open up the image in a new window.
- Right click on the image and click Save Picture As…

- Navigate to C:\Program Files\Windows Home Server and create a new sub folder called OEM.
- Save the file as ServerImage.png.
- Double click the Windows Home Server Console icon, click Settings, then Resource and you should see this under Home Server:


- You can now log off and unplug the keyboard, mouse and video.
- While you are now done with the custom installation of your Mac Mini (and you should be very happy), there is still network setup to complete on your HOME computer. Simply power on the Mac Mini and proceed to Step 3:Install the WHS Connector Software of the Windows Home Server Getting Started Guide that came with the OEM install DVD.
You now have an Apple Mac Mini running Windows Home Server. I wonder what the folks out in Cupertino will think of that?
You’ll likely want to expand the storage via external Firewire or USB drives, but that’s pretty easy to do. In my next article, I’ll show you how to run Windows Home Server on an iPhone. Just kidding.
1 The iHomeServer does not really exist and is obviously a parody. You know, something like SNL would do and not get sued over. :)


![image37_thumb[1]](http://lh5.ggpht.com/donavon.west/SA1GkXDyT8I/AAAAAAAAAuQ/qm0g2N_BoN4/image37_thumb1_thumb.png?imgmax=800)
![image40_thumb[1]](http://lh3.ggpht.com/donavon.west/SA1Gl3DyT-I/AAAAAAAAAug/vQmjMh62W-s/image40_thumb1_thumb.png?imgmax=800)
![image52_thumb[1]](http://lh3.ggpht.com/donavon.west/SA1Gm3DyUAI/AAAAAAAAAuw/LW1TulPVfkc/image52_thumb1_thumb.png?imgmax=800)


17 comments:
Very cute...all of it. Now, onto something really worthwhile...
software that enables a Mac to connect to a WHS properly and interact with it effectively...shares are not really the answer.
Worthwhile...because I'd like it...
@hakr - The WHS team is well aware of the community desire for WHS support for the Mac, but keep your comments coming.
Question: Would you like a WHS connector for the Mac or would you prefer TimeMachine emulation on WHS? I'm just curious.
You mention that you have to insert the Windows CD fast into the drive before Mac OS X launches.
But you don't have to it this way. Press and hold Alt when you push the powerbutton, and then you'll be able to choose which disk/drive you want to startup with.
Why on earth would I want to take a perfectly good Mac and put Windows on it? If I wanted Windows, there's TONS of vendors out there that would sell me a box.
@Pecos Bill
Because a) it's small and unobtrusive (although once you start adding external storage, that changes), and b) it's vewy vewy qwiet. Both of these are fine attributes for a home server.
And if you're a true geek, then there is a third reason: because.
Is it impossible to connect to and access the info stored on the mini (since it now has WHS) using another mac?
KUDOS! now this is more like-it!
Donovan asked:
"Question: Would you like a WHS connector for the Mac or would you prefer TimeMachine emulation on WHS? I'm just curious."
I'd prefer a WHS connector for my Macbook Pro so I can autobackup the laptop just like my PCs and "get to" my WHS just like with my PCs. I am not a fan of Time Machine for a variety of reasons. At the moment, I use a Mac program called SuperDuper to back up my Macbook Pro...onto a dedicated external hard drive connected via firewire.
I think David had it correct. The question of why can be answered: Why not?
I was thinking about stacking some of those Mac Mini looking external hard drives (maybe 3 x 1TB), which would make sweet WHS system.
Why would anyone in their right mind want to use such an expensive piece of hardware for a server?
There are plenty of cheap PCs out there that could do the same..or you could build one of your own.
Either would be less expensive than taking a Mac mini and wiping it clean of OS X.
Now if one wants to use a Mac mini just as a computer with two (or more) OS' that's another thing. But to use it to run Windows home server?
It sounds like something an idiot in training might attempt.
Again, why do it? Why not? Some of the best innovations have been created by geeks to the tune of why not try this, or wonder what would happen if I did that...
Interesting... but why destroy a nice Mac Mini! I have been using MS products since around '84 with early DOS releases and decided to try OS X in August of 2007 with the purchase of a iMac. I have since purchase another Mac Book Pro and now have no problems with 'blue screens', viruses, spyware, etc... I also am able to run Windows with VMWare Fusion and that works great. I am still running Windows machines but, If you like Unix/Linux and want a commercial implementation with nice GUI it is very a stable solution.
I, too, would like to see WHS support for the Mac!
Deputy - Surely you can format it back to OSX afterwards. At least that's what I plan to do after trying this out (might look for a secondhand Mini if it works for use as a server) - the Mini isn't being used at the moment so why not try ;)
Update: The Mini is now back to OSX - I was impressed with WHS though... MS did get something right
with WHS i can back up my mac with NTFS partition?
You do because its KEWL!!! I hate when Apple fanboys get winny, give Apple a bad name.
Post a Comment