Stuff to pimp your Windows Home Server

Hacking Windows Home Server is a blog dedicated to Microsoft's WHS technology. Brought to you by Donavon West, Microsoft MVP and author of LiveGadgets.net and donavon.com I'll also discuss the Hewlett-Packard HP MediaSmart Server EX470, EX475, EX485, EX487, the T7-HSA Tranquil Harmony Home Server and any other new Home Server hardware platforms that arise. You can also call this hacking or hackz. In any case I will show you some cool things to make your Microsoft Windows Home Server even sweeter.

A blog devoted to getting the most out of your
Windows Home Server by Microsoft MVP Donavon West.
Showing posts with label diy. Show all posts

Sunday, January 25, 2009

Extreme Makeover Windows Home Server Edition

(Or how to build an 11 Terabyte Windows Home Rack Server)

image image

In this article, I will show you how I took an old 40 lb rack mount server chassis (that I've been lugging around for I don't know how many years) and turn it into a shiny new low power 11TB Windows Home Rack Server.

I recall building this "thing" back in the early 2000s. My goal was to come up a reliable system to store all of my ripped DVD movies and MP3s. It consisted of a two AMD XP 1800 processors (not two cores, but two actual processors), 1GB of RAM, an 80GB IDE boot drive and a Promise RAID-5 card with 6x IDE 120GB drives, yielding a whopping 600GB after parity! The 80 pin ribbon cable was so thick you couldn't see a thing. I also remember that it put off enough heat to keep the basement comfortable during a cold Chicago winter.

image image image

My dream lasted for a year or so before slowly the drives started going south (probably because of poor air circulation caused by all of the forest of ribbon cable). When three drives failed at once, my dream was eventually tossed into a pile in the basement where it laid collecting dust.

Until last week…

Wanting once again to realize my dream of a full rack of NAS storage, I started to look around for a way to breath new life into my old trusty friend. In stark contrast to the gas guzzler that I had before, I set out to design a system with an 11 terabytes of hot-swappable storage and a low power processor. It was to have the drive capacity of a Hummer with the power savings of a Prius.

Table of Contents

Here are the sections that I will cover:

  • Shopping List
  • Building the basic one drive WHS system
  • Installing the OS
  • Adding 10 additional hard drives using a Port Multiplier
  • Installing the Promise SATA driver
  • Making it My Own
  • The HP MediaSmart Server vs. the 11TB Windows Home Rack Server
  • Observations/Final Thoughts

Shopping List

Here is my shopping list:

image image imageimage

Here is a system diagram of what I will be building:

rack-system-diagram 

Building the basic one drive WHS system

I'll be putting together the system one step at a time, initially installing just the essentials. I'll add the Promise SATA card, port multipliers and connecting the SATA back planes. Here's the play-by-play:

  1. First step was to gut my old system, leaving nothing but the chassis.
  2. Next I removed the drive cages.
  3. Then I mounted the three hot swappable SATA back planes onto the removable cages. Since I had two 5.25" openings (one with 4 vertical bays and the other with 3 horizontal bays) by two "2 into 3" and one "3 into 4" back planes would yield 10 hot swappable drives.
  4. The eleventh drive will be fixed and mounted internally (i.e. not hot-swappable) and will act as the system drive. If the system drive goes bad, hot swapping won't help me too much.
    image
  5. Next I mount the cages back into the chassis. Beautiful!
    image image
  6. Next I mount the power supply. A little bit of a snag here as I haven't determined exactly which one that I want, so I haven't ordered on yet. In the mean time, I'll re-install and use the old 430W power supply until the new one arrives.
  7. A word about power. I use this online Power Supply Calculator when build a system like this. It takes into account various aspects of your system (RAM, processor, drives, etc) to make a recommendation on the wattage of power supply that you need. As you can see (below) my old PSU will do fine for now. Capacitors can degrade over time and effect total power output of a PSU (as much as half). This power supply is at least 5 years old, so I won't load it up with 11 drives until I get the new one installed just to be sure.
    image
  8. I attach the power supply to the motherboard and to my system drive.
  9. I install the RAM and attach the SATA cable to the system drive.
    image 
  10. Next I temporarily connect an old DVD ROM drive, to install the OS (no USB key this time, just to mix it up a bit).  I won't mounting it to the chassis as it will be removed after the OS is installed.
    image
  11. Almost ready to flip the switch. But first plug in a VGA monitor, USB keyboard and mouse.
  12. Everything ready and fire extinguisher on hand, I throw the switch, and… the system boots! I press DEL to enter system BIOS and look around. Everything looks good. Then I ESCape from BIOS and the system reboots. This time I get about a 1/2 sec of boot time, then the system shuts down. Unplug the PSU and double check everything. it all looks good so I power back up. Same thing. I try again. This time nothing! I have a power light on the MD, but the system will not power on. My theory is this: the CPU heatsink is not seated properly (from the factory). The system ran for a little while and heated up. It shut down once because of heat. The next time was too much and the CPU cooked. Forgive me as I fill out an RMA for Newegg.
  13. (time passes)
  14. image The good new: the delay caused by the faulty motherboard allowed me to order a power supply. I also decided to change my motherboard to the Intel Atom 330 (a steal at $84, processor included). The specs on my original MB were great, but the reviews: not so much. Both new parts came UPS today. I installed both, powered up and… IT WORKS!

Installing the OS onto an Atom 330 System

Now that the hardware is functional, I set off to install the OS:

  1. Insert the WHS DVD and follow along until installation is complete.
  2. We're not done yet. I now need to install the network driver.
  3. Click Start, right click on My Computer and click Manage.
  4. In the left panel click on Device Manager.
  5. On the right panel, under Other Devices, you should see Ethernet Controller.
  6. Right click on Ethernet Controller and click Update Driver…
    image
  7. A dialog should appear. Select Install from a list or specific location and click Next.
    image
  8. Check Include this location in search and click Browse. Select the folder D:\DRIVERS (where D: is your DVD drive) and click Next.
  9. A list of possible drivers will appear. Choose the one highlighted.
    image
     
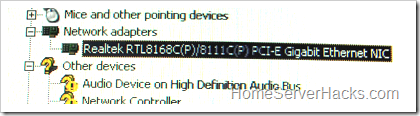
  10. The drivers installs and if successful, you will see Realtek appear under Network Adapters in the right panel.
    image
  11. At this point you are done with the network drivers, but as you can see there are more unknown devices and we still need to install the SM Bus drivers.  Run EIVCD.exe from the Intel installation CD to install them or just allow the CD to Autorun. Note that I could have installed the network drive using the automated installer as well, but I wanted to get it in before any system reboots, so I did it first and manually.
  12. We are finally done. You will likely find that you need to run Windows Update to get the many, many latest updates for your system.

Adding 10 additional hard drives using a Port Multiplier

With the basic system up and running, it's time for the fun part. Now we get to install the Promise TX4 SATA card, the port multipliers (aka PM) and the 10 hot-swappable SATA drives! I've never seen ten 1TB hard drives in one place before. It's an awesome and intimidating site to behold, I can assure you.

  1. Insert the Promise TX4 onto the only PCI slot on the motherboard.
    image
  2. Mount the two port multipliers to the chassis. They are designed to be mounted in any available standard add-in card bracket, but in order to reduce the cable runs, I've come up with a unique solution. I've replaced the standard bracket with the included low-profile bracket and mounted them "upright" to the floor of the chassis (using two of the full sized ATX motherboard mount points) as close to the SATA back planes as possible. This will dramatically reduce the length of the SATA cables needed.
    image
  3. Next, start cabling up the system. Connect a single SATA cable from the connector marked SATA1 on the Promise card (marked C on the system diagram) to the Host SATA Port on the first PM (D). Repeat for the other port multiplier using the connection of the Promise card marked SATA2 (G and H on the system diagram).
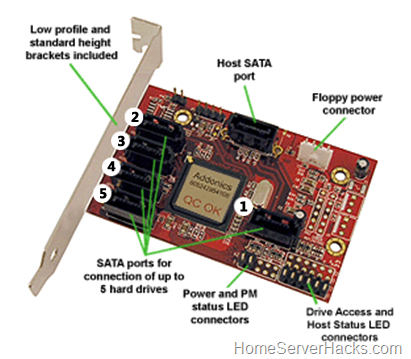
  4. Now connect ports 1-5 of each port multiplier to the SATA back planes. You should try to do this in a logical manner (left to right, then top to bottom). Here is a diagram of the 5-1 Port Multiplier that I used:
    image
  5. Here is a picture of the completed hardware installation. Notice now the Mini-ITX Atom motherboard almost gets lost in the giant rack chassis. It's almost comical. 
    image
    P.S. I'm ordering some shorter SATA cables to run from the TX4 to the PMs.

Installing the Promise SATA driver

Now that the hardware is ready, lets install the driver.

  1. First, download the latest Windows driver from the Promise website.  You want the one named SATA300TX2plus/TX4 Windows Driver.
    image
  2. Unzip this somewhere (maybe in My Documents). 
  3. Next go to the Device Manager (Start, right click on My Computer, click Manage, then select Device Manager) and right click on Mass Storage Controller and click Update Driver. It should have a yellow question mark next to it.
    image
  4. Select Install from a list and click Next. 
    image
  5. Check the box Include this location in the search, click Browse. Navigate to the folder that you created in step 2 above and select the i386 subfolder. Click Next to begin installation 
    image
  6. When the drive in completely installed you will see this:
    image
  7. WSS should now recognize 11 drives in the system. You will need to run the WHS Console and add each drive to the "pool" using the Add a Hard Drive Wizard. To do so, go to the Server Storage tab, highlight one of the Non Storage Hard Drives, click Add, then follow the defaults in the Wizard.
    image
  8. When were done adding all ten drives, the Server Storage tab looks like this (note that I had already copies over some data when this screen shot was taken). Now that's a lot of drives!
    image

NOTE: After adding all of the hardware and installing the Promise TX4 driver, I could not get the fifth drive on each of the SATA port multipliers to be recognized by the OS. I wrote Addonics and they wondered if there was an incompatibility with the TX4. I asked if they had any compatibility tests that they had ran against the TX4 and they said they hadn't' tested it with the TX4. I find it hard to believe that they wouldn't test against such a common SATA card.

Long story short, I'm still researching the "fifth drive" problem on the Addonics 5-1 PM. In the mean time, I've moved the two drives to ports 3 and 4 of the Promise TX4 and am not very pleased with Addonics lack of help on this matter.

Making it My Own

Now for the obligatory server image icon:

  1. Navigate to C:\Program Files\Windows Home Server and create a new sub folder called OEM.
  2. Grab this file from my Windows Live Skydrive and save the file as ServerImage.png.
  3. Double click the Windows Home Server Console icon, click Settings, then Resource and you should see this under Home Server:
    image 

The HP MediaSmart Server vs. the 11TB Windows Home Rack Server

Let's compare our DIY 11TB Rack Server with the new the HP MediaSmart Server EX487 to see how ours stacks up:


11TB Windows Home Rack Server

HP EX487

Processor/speed

Intel Atom 330 dual core 1.6GHz

Intel Celeron 440 2GHz

Size

huge

small

Power (at idle)

92 watts

50 watts

Hard drive capacity*

11 Terabytes
(11x 1TB drives)

1.5 Terabytes
(2x 750GB drives)

USB Ports

4 rear

1 front, 3 rear

Time to transfer an
8.3 GB video**

4 mins 21secs

4 mins 35 secs

Price

aprox $2000

$749 MSRP

Cost per GB

18 cents/GB

50 cents/GB

* Size before formatting
** same file copied from my laptop via Gigabit Ethernet connection

Observations/Final Thoughts

  • All closed up, temperatures inside the box are not bad at all. the motherboard is 42C with the processor and chipset (marked Aux below) at 49C and 44C respectfully. This is because of the large PSU fan (blowing hot air out) and three SATA back plane fans (drawing fresh air in). Even the average temp of the hard drives is pretty low when they have been idling: about 33C.
    image 
  • The Windows Home Rack Server is actually testing slightly faster in my file transfer tests. I am unsure as to the reason, but it does suggest that the Atom 330 is more than adequate to keep up with simple NAS operations.
  • The 650 watt PSU I selected is overkill, but I wanted one that was 80+ rated (for better efficiency). I may reuse this one elsewhere and buy a lower wattage PSU for this Windows Home Rack Server.
  • The Intel motherboard has a small chipset fan that is LOUD. I will definitely replace it with a larger passive heat sink, but that will be the subject for another article.
  • The Atom 330 processor uses Hyper-Threading technology. That along with dual-cores helps the 330 to perform well above it's meager 8 watt TPD would suggest.
    image
  • Western Digital Green 1TB drives are quiet, low power and relatively inexpensive. I highly recommend them!
  • At over two and a half times the price of the HP EX487, this machine initially seems very expensive. That is until you look at the cost/GB. My Windows Home Rack Server costs 18 cents for every GB whereas the HP EX487 costs 50 cents/GB, making my 11TB Windows Home Rack Server look like a bargain (or at least that's how I explained it to my wife). ;)

Read the entire post, Leave a comment and More...
27 comments (so far). go ahead and add to the noise.

Tuesday, January 13, 2009

Eee Home Server Box

image

For my next DIY build, I'm going compact, low power, easy to build and most importantly stylish. I'm going to take the Intel Atom powered Asus Eee Box and show you how to use it as a Windows Home Server. My initial tests show that the Eee Box draws only 12 Watts of power when idle, thanks to the power thrifty Intel Atom processor, making it a perfect candidate for my build.

As the Eee Box was meant as a low power replacement for yesterday's massive desktop office PCs, Asus did away with normal things like a CD/DVD drive and lots of drive bays. And because there is no DVD drive, we will once again be installing WHs from a USB memory stick.

image Here's are the specs for the Eee Box that I used:

  • Processor: Intel Atom N270 (1.6GHz)
  • Memory: 1GB DDR2
  • Hard Drive: 160GB SATA 5400rpm
  • Network: 10/100/1000Mbps
  • USB: 2 front, 2 rear
  • Dimensions: 223×178×16 mm (without stand)

Both Newegg or Amazon have the Asus Eee Box for sale at only $299. The Eee Box is available pre-loaded with Linux or for an extra $15, Windows XP. As we are going to wipe out the OS and install WHS, you can go ahead and save the $15.

Load it Up with Storage

There is one more thing that you should think about, and that is storage. The Eee Box has a single 2.5" 160GB laptop drive. If I were building this as my primary home server, I would do this:

I would place the Eee Box on the top of a cabinet for everyone to see and keep the two external drives tucked away somewhere. I would avoid using either of the front  two USB ports as the would severely distract from the look. In my opinion, that would make for a sweet setup!

Upgrading the Hard Drive in an Eee Box (optional)

Now before you get out your screw driver, know this: you are about to void your warranty. Still with me? Ok, let's go.

  1. With the power OFF, turn over the Eee Box and using a penny unscrew the large flat scew that attached the base to the main unit.
  2. Remove that annoying warranty voiding Eee Box sticker.
    image
  3. Remove and set aside the two small Phillips head screws. Do not remove the one on the case, just the two on the drive bay.
    image
  4. Gently pull on the drive release "handle" (if it's not user upgradable, why does it have a handle). Don't pull too hard or you'll yank the handle right off. Wiggle it around and apply light outward pressure. You may even need to help it along by prying up on the edge with a flat head screwdriver.
    image
  5. Remove the drive from the tray with the 4 screws.
    image
  6. Reverse the process with the new larger drive.

Installing the OS

image

As this is about the eleventy-billionth DIY build that I've shown you how to do, I'll forgo the length "how to install WHS from a USB memory stick" instructions and point you here instead (read parts 3 and 4).

There are a few peculiarities in this build that deserve mention. First, WHS does not natively recognize the Realtek Ethernet hardware in the Eee Box, therefore we will have to install it manually. Download the network driver here. You'll want to get the one called WinXP (WinServer 2003) Driver. As you build the memory stick, unzip the contents of the ZIP file into a folder named EeeBox.

Next, there are some Intel chipset drivers (shown as the SM Bus device) that we will want to install drivers for as well. Download the INF update Utility from Intel's website and copy it to the EeeBox folder on the USB memory stick.

With our bootable memory stick in hand, we are now ready to start the WHS OS install. Again, follow these instructions. If you are not using a fresh drive (i.e. not doing the 500GB upgrade), you will need to go into the BIOS and temporarily assign your USB memory stick as the primary boot drive and catch the first "rebooting" message (as mentioned in the KPC installation article).

When the OS is completely installed and you get to step 24, DO NOT REBOOT. You will now need to install the network driver and SM bus driver.

Installing the Network Driver

  1. On the Eee Box, click Start. Right click on Computer and click Manage.
  2. Click on Device Manager. You should see several items with yellow icons under other devices.
    image
  3. Right click on Ethernet Controller and click Update Driver.
  4. A dialog will open. Select Install from a list or specific location and click Next.
    image
  5. Check the box Include this location in search, click Browse and select the folder EeeBox\Driver_XP_5708_1222 from the memory stick (drive X:). Click Next to continue to install.
    image
  6. That's it! If successful, you will see the Realtek device moved under Network Adapter.
    image

Installing the SM bus Driver

  1. On the Eee Box run the application and after a moment you should see this screen. Click Next.
    image
  2. Thoroughly read and accept the license agreement by not reading the license agreement and clicking Next.
  3. Click Next after reading the Readme file (why so many screens?).
  4. You will see many drivers installed. Eventually Setup will complete. Click Next to continue.
    image
  5. You will need to reboot to finish installation.

Customizing the Windows Home Server console

I like to give my DIY builds that OEM feel, so I've designed some custom Asus Eee Box icons that will be displayed in the Windows Home Server Console.

  1. Make sure that your WHS Console is not open.
  2. On your EeeServer open an Internet Explorer browser.
  3. Download this image file from my Windows Live SkyDrive.
  4. In Windows Explorer, go to \\Program Files\Windows Home Server and create a subfolder named OEM.
  5. Copy the downloaded image file into this newly created folder.
  6. If you open up the WHS Console and click on Settings then Resources, you will now see the custom EeeBox icon:
    image

Conclusion

There are other less costly solutions out there, but if you are looking for a low power, easy to assemble, quiet WHS solution that just happens to be stylish, you may just want to consider the Asus Eee Box.

Oh, and if you are interested in what this little beasty looks like on the inside? AnandTech cracked on open and has lots of pictures! I prefer to leave mine alone.

Read the entire post, Leave a comment and More...
21 comments (so far). go ahead and add to the noise.

Wednesday, January 7, 2009

VIA ARTiGO A2000 as a WHS

image

As reported Monday on WeGotServed, VIA is showing off it's latest small wonder, the A2000, at the 2009 Consumer Electronics Show (CES). I was fortunate enough to get my hands on one of these little devils a few days before the show began. VIA does not sell the A2000 as Windows Home Server (i.e. you can not buy it with WHS pre-installed like you can with the HP MediaSmart Server), however with a $99 Windows Home Server System builder DVD in hand, I will show you how to turn this little gem into a great little Windows Home Server!

The A2000 is based on the VIA C7-D  processor running at 1.5GHz and the VX800 chipset. It features one slot for up to 2GB of DDR2 RAM, two 3.5 inch SATA drive bays, 3 USB ports and a gigabit Ethernet. The barebones system retails for $299. You can read more about the A2000 on the VIA website.

Parts List

Before you begin, gather the following:

You will also need temporary use of a USB keyboard, USB mouse and a VGA monitor in order to install the OS.

Assembling the hardware

I'm almost ashamed to be writing up a how-to on assembling the hardware because it is so easy to do, but I have some helpful tips along the way. All you need is a Phillips screw driver.

  1. Remove the 3 screws from the back of the computer that secure the case.
    image
  2. Slide the case forward and up.
  3. Press in on the 4 plastic latches that hold the front panel in place.
  4. Hinge the front cover down. Note: be careful not to stretch the wiring so far as to disconnect anything. That was one of my helpful hints :)
    image
  5. Slide in one or two SATA hard drives. If you are assembling a one drive system, place the single drive on the bottom (even thought the back plane is labeled the other way around).
    image
  6. When sliding in the lower hard drive, be careful, the clearance above the red SATA connector is tight! You may have to carefully bend it out of the way, being careful not to disconnect it.
    image
  7. Screw each drive into place, each with 4 screws (provided).
    image
  8. Replace the front panel and the main cover.
  9. Plug in the power, network cords. USB keyboard and mouse.

Installing Windows Home Server

If you've been following my DIY hardware builds, you can guess what is about to happen next (yes, it involves a USB memory stick).

  1. On a Windows Vista computer, create a bootable USB memory stick as shown in this article (steps 1-8).
  2. We will need to copy over the Gigabit network drivers from the VIA CD. Open Windows Explorer and create a folder on the memory stick called A2000.
  3. Open another Explorer window and navigate to D:\Drivers\GLAN\vt6120_vt6122_vt6130_vt6132_drivers31_full\Velocity_Driver_v31_VIA\XP_Srv2003_2K_ME_98SE (where D: is the driver letter of your CDROM)
  4. Drag and drop the X86 folder onto the memory stick.
  5. Insert the USB memory stick into the A2000 and turn on the power.
  6. The A2000 should recognize a non-bootable hard drive and a bootable memory stick so the WHS installer should run.
  7. From this point on it should be an unattended install taking about an hour and what will seem like about 900 reboots.
  8. When the installation is done, you will see this screen:
    image
  9. Now enter a password (this will be your Administrator password).
    image
  10. Enter your preferences for the next few screens and you finally will see this message.
    image
  11. DO NOT SHUT DOWN OR REBOOT YET. We need to install the network drivers.
  12. On the A2000 click Start, right click on My Computer and click Manage.
  13. In the left panel click on Device Manager.
  14. On the right panel, under Other Devices, you should see Ethernet Controller.
  15. Right click on Ethernet Controller and click Update Driver…
    image
  16. A dialog should appear. Select Install from a list or specific location and click Next.
    image
  17. Check Include this location in search and click Browse. Select the folder X:\A2000\X86 and click Next. This is the location of the drivers that we copied to the USB memory stick back in step 4.
    image
  18. The drivers installs and if successful, you will see this in the right panel.
    image
  19. At this point you are done, although you will likely find that you need to run Windows Update to get the latest updates for your system (mine installed 51 High Priority and 4 Optional Software updates). You will also want to install the Connector software on your client PCs.
  20. Go ahead and unplug the USB memory stick, USB mouse, keyboard and VGA monitor. You won't need them anymore as everything can now be administered via the Windows Home Server Console.

The obligatory "customization" icon

I like to give my DIY builds that OEM feel, so I've designed

  1. Make sure that your WHS Console is not open.
  2. On your A2000 Home Server open an Internet Explorer browser.
  3. Download this image file from my Windows Live SkyDrive.
  4. In Windows Explorer, go to \\Program Files\Windows Home Server and create a subfolder named OEM.
  5. Copy the downloaded image file into this newly created folder.
  6. If you open up the WHS Console and click on Settings then Resources, you will now see the custom A2000 icon:
    image

This is the all important comparison section

Let's compare it with the WHS "standard", the HP MediaSmart Server EX485 and our DIY low cost $300 KPC server:


Shuttle KPC

HP EX485

VIA A2000

Size

small

small

smaller

Power (when idle)*

51 watts

50 watts

29 watts

Internal drive bays

2

4 (hot swappable)

2

USB Ports

4 rear

1 front, 3 rear

1 front, 2 rear**

Price

$310

$648 MSRP

$299 barebones
$475 complete***

Processor/speed

Intel Celeron 430
1.8GHz

Intel Celeron 440
2GHz

VIA C7-D
1.5GHz

* Wattage depends of brand and type of hard drives installed. These numbers represent the computer with 2 drives installed. Measured using a Kill-a-Watt.
** there appears to be a fourth USB port header on the A2000 mainboard (probably to support an optional internal wireless card). It would require some clever hacking to be of any use, like an internal 2.5" USB drive perhaps. :)
*** Includes the cost of WHS OEM DVD, 1GB memory and 1x 500GB hard drive.

The Bottom Line

The VIA ARTiGO A2000 makes a great little Windows Home Server. It's one short coming, as I see it, is that is only has room for two internal SATA drives (I consider three drives as a minimum for an entry level WHS). The "third drive" (or even a forth or fifth) is easily overcome using external USB drives. But compared to the KPC (which also has just 2 internal drive bays), the A2000 is smaller, quieter and uses less power. Advantage A2000.

HP MediaSmart Server vs. VIA A2000

The C7 processor is not as powerful as the Intel Celeron 440 that is in the new HP, but speed in a home server is not necessary for nightly backups and file sharing. An "always on" server should be as miserly as possible and at 29 watts, advantage A2000.

It's other advantages over the HP MediaSmart Server are obvious: size and cost. The A2000 is the same width as the EX485, one inch longer and less than half the height. At about two thirds of the cost, the VIA A2000 will certainly give the HP MediaSmart Server a run for it's money for many households.

Read the entire post, Leave a comment and More...
7 comments (so far). go ahead and add to the noise.