<< Read Previous Part 3 >> Read Next Part 5
In Part 3 we prepared a bootable USB flash drive with Windows Home Server. In this part we will show you how to setup the BIOS and install WHS from the USB flash drive. We suggest that you read through the instructions fully before you start. If that is too much to ask, at least read through each step fully before you do it as there are important caveats and tips included that will make or break the installation.
- First, plug in a mouse, keyboard and monitor into the appropriate inputs at the back of the KPC Shuttle. Power on your monitor.
- Make sure that the KPC is powered OFF. Seriously, make sure it is off and THEN place the bootable USB flash drive into one of the USB ports on the back of the KPC. THE FLASH DRIVE MUST STAY PLUGGED IN TO THE SYSTEM UNTIL THE INSTALLATION IS COMPLETE. Do not remove the flash drive until instructed to do so! (step 31) Removing it prematurely can cause real problems with your installation.
- Press the power button on the front on the KPC unit to turn it on.
- As this is the first time you have booted the KPC since adding a processor, there are a few different screens that may appear. No matter what you see, press the DEL key repeatedly to the enter the BIOS setup. I ran this installation a number of times and found that a few things could happen - the BIOS may complain about 1) a CMOS checksum error, or 2) a new processor error. Or you may simply see the Shuttle logo screen. Here are a couple of screen shots that I saw during my test runs. Again, it really doesn't matter which screen you get, we just want to get into the BIO setup so as soon as you see "life" press the DEL key repeatedly within 3-5 seconds. If for some reason you miss the window for entering the BIOS setup within the first 5-10 seconds of "life", there are a variety of things that will happen. It doesn't matter what happens, once you miss the BIOS setup you will have to power the KPC off and on to try to get into BIOS again.


- Steps 5-8 show how to prioritize the USB flash drive as the boot up disk in the BIOS setup. Once in the BIOS setup, with the arrow keys, position the cursor to Load Optimized Defaults and press Enter. You will see a confirmation box appear. Press Y (yes) and press Enter.


- Now cursor to Advanced BIOS Features and press Enter.

- As the USB flash drive appears to BIOS as a hard drive, we want to make sure it boots before our real hard drive. Cursor to Hard Disk Boot Priority and press Enter.

- Locate the USB flash drive and click the plus key to move it to the top of the list.

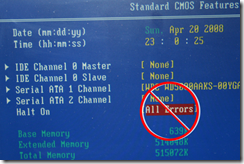
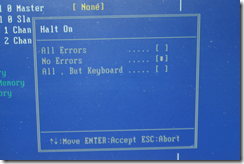
- Once we are done with installation, this will be a "headless" server (i.e. without a keyboard, mouse or monitor), so we need to disable the BIOS setting "Halt on Error". Steps 10-12 explain how to make this change.
- Press ESC twice until you are back on the main BIOS setup screen.
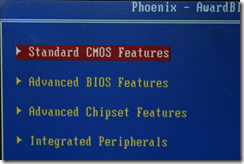
- Cursor to Standard CMOS Features and press Enter.
- Make sure that Halt On is set to No Errors. If not, press Enter on the current value, cursor to No Errors and press Enter.
- Finally press F10 to save these new settings and exit.

- As soon as you exit, the system will reboot. You HAVE to watch this process, even though it takes a while. (I know it's like watching paint dry, but you really have to sit and watch this. Think of it this way - you are watching your WHS being born. It's exciting!) You should see the logo screen appear, followed by "Verifying DMI Pool Data...", "Windows is loading files..." (screen shot 1) and "Setup is initializing..." (screen shot 2). Eventually it will enter a Windows Home Server setup screen which you have to watch as it takes several minutes to format the system drive and copy system and installation files.
1) 2)
2) 
THE MAIN THING YOU ARE WATCHING FOR is the "Rebooting the OS" notice (screen shot 3). Watch the progress bar at the bottom because right after this message, WHEN THE COMPUTER STARTS TO REBOOT, PRESS DEL REPEATEDLY TO ENTER THE BIOS SETUP.
3) <---LOOK FOR THIS!
If you miss the "Rebooting the OS" message and it reboots without your pressing DEL to enter the BIOS, the installation procedure will repeat from (logo screen, "Verifying DMI Pool Data", etc.) and you will have another chance to enter the BIOS during reboot. It will just keep repeating the installation until you press DEL during reboot. - Now that we are in the BIOS setup, we need to change the hard disk boot priority back, raising the system hard drive to the top.
- As before, cursor to Hard Disk Boot Priority and press Enter.
- This time locate your system hard drive and click the plus key to move it to the top of the list.
- Again, press F10 to save and reboot.
- Everything else for the next 50 minutes or so is automatic. The system will reboot a half a dozen times or so during this time.
- Eventually, you will see this screen. Click the arrow next to "Welcome".
![image37_thumb[1]](//lh5.ggpht.com/donavon.west/SA1GkXDyT8I/AAAAAAAAAuQ/qm0g2N_BoN4/image37_thumb1_thumb.png?imgmax=800)
- Now enter a password (this will be your Administrator password).
![image40_thumb[1]](//lh3.ggpht.com/donavon.west/SA1Gl3DyT-I/AAAAAAAAAug/vQmjMh62W-s/image40_thumb1_thumb.png?imgmax=800)
- Enter your preferences for the next few screens and you finally will see this message.
![image52_thumb[1]](//lh3.ggpht.com/donavon.west/SA1Gm3DyUAI/AAAAAAAAAuw/LW1TulPVfkc/image52_thumb1_thumb.png?imgmax=800)
- BUT WAIT. Before we can log off, we must install the LAN driver.
- Bring up Windows Explorer and open the USB flash drive. Open the Shuttle folder and double click on install.exe.
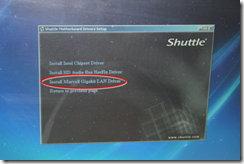
- Click on Install Motherboard Drivers, then on Install Marvell Gigabit LAN Driver. You have to reboot the KPC like you normally would (from the Start menu).
- Log into WHS as Administrator with the password you setup previously.
- Run Shuttle install.exe again. This time click on Install Intel Chipset Driver. You will be prompted to reboot but DON'T. Instead, go on to the next step.
- There is one last optional step. The WHS Console allows OEMs to customize the icon on the Settings, Resources dialog. Open the USB flash drive and navigate to the HSH folder. Double click on the file ServerImage.cmd to copy the file. Note: Do not have the WHS Console open at the time you run ServerImage.cmd or you will get an error.
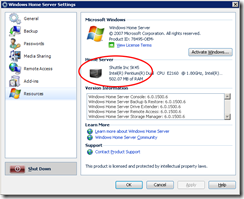
- Shut down the system.
- You may NOW remove the flash drive! Also, disconnect the keyboard, monitor and mouse. We are done with these components so you can return them to their original home.
- While you are now done with the custom installation of your KPC (and you should be very happy), there is still network setup to complete on your HOME computer. Simply power on the KPC and proceed to Step 3:Install the WHS Connector Software of the Windows Home Server Getting Started Guide that came with the OEM install DVD.
Congratulations! Your KPC Shuttle based Home Server is ready for action. Proceed to Part 5 for the last fun step - learn how to "kustomize" the front panel of your new machine.


![image37_thumb[1]](http://lh5.ggpht.com/donavon.west/SA1GkXDyT8I/AAAAAAAAAuQ/qm0g2N_BoN4/image37_thumb1_thumb.png?imgmax=800)
![image40_thumb[1]](http://lh3.ggpht.com/donavon.west/SA1Gl3DyT-I/AAAAAAAAAug/vQmjMh62W-s/image40_thumb1_thumb.png?imgmax=800)
![image52_thumb[1]](http://lh3.ggpht.com/donavon.west/SA1Gm3DyUAI/AAAAAAAAAuw/LW1TulPVfkc/image52_thumb1_thumb.png?imgmax=800)


14 comments:
Instead of mucking about with the boot order in steps 6-8, wouldn't it be more useful to use the one-time boot option of the KPC and then you won't have to babysit the install process.
@patrick - You are absolutely right. The babysitting is the biggest problem I was having when writing up the instruction. I know that some BIOSs support a boot menu (or one time boot option) with F2 or F12, but I tried these on the KPS without any luck. What one time boot option are you speaking of. If you have a better way, I'll change the instructions and gladly credit you.
Nice article.
I bought the KPC to install WHS before you have the article, and I was trying to get a friends CD drive to install WHS.
I tried to install with USB, After i saw your post. followed the steps as you've said. Everything went fine for about 40min, after several boot-up's as windows server 2003 and installing a bunch of updates it fails :(. It says "Installing Windows Home Server" on the left side progress bar and an error window pops-up saying "setup is already running", I click OK and installation continues and seems normal. Then finally when it comes to the "Welcome" screen, i click ">" (next). It shows "error. installation has failed... etc.. etc.. press back to try again...press next to exit setup.." nothing specific to what has failed or gone wrong :(
I think it has something to do with the initial error ("setup is already running" error) that showed up!, is it caused because of having my USB drive connected and it automatically starts Home Server installation when system boot's-up into windows server 2003 and recognizes the USB!?
I'm curious how much power the fully configured KPC pulls. Do you have a Kill-A-Watt to use to measure the power draw? I have a homebuilt WHS with a single 500GB HDD and an AMD BE-2300 CPU that pulls about 39W from the wall at idle. I'd love to see how compare the power consumption of the two systems to see if it's worth it to build a new system (for fun mainly, not for real cost savings).
@Jim - I orderd a Kill-a-Watt tonite and will report on the numbers when it arrived. Thx for the suggestion.
@donavon - I just doublechecked and for some reason (beyond my comprehension) Shuttle didn't include a one-time boot menu for the KPC.
Sorry for distracting off a well written article.
Very nice project: Congratulation!
I've been looking around for some months to get a small case that will allow me to implement WHS and get something close to an EX470 'boosted' (I found the price for the EX470 + mem/CPU/drive upgrade to be quite high compare to such kind of solution).
I discovered the KPC with your article.
Last thing missing for me to decide: could you please provide some benchmark of file transfer performances with your E2160?
Hi, I have read this and think its amazing, i dont have a shuttle but wanted to make this bootable usb for WHS, however, it doesnt seem to boot. is this only compatible with the shuttle or is there a way to make the bootable USB for any machine. thanks for any replies
Donavon, have you had a chance to do any power measurements with your Kill-A-Watt yet?
I have a kill-a-watt on my kpc and it draws 46 watts with the configuration below.
Celeron E1200 (dual core)
500GB Seagate HD
1GB DDR2 (PC5300)
This post is great and helped the set up go very smoothly, up until the frozen "Shuttle" screen. No POST just a black screen that says "Shuttle" and intel. I tried hitting Delete before I saw the screen, after I saw it...no joy. Any advice on trouble shooting? Seems hard to do without any beeps.
Just picked up a Kill-A-Watt monitor and thought I'd drop my results in here for my system for anyone who is interested.
KPC K45
Intel Celeron 440 2.0 GHz
1gb RAM
Two 700GB hard drives
cpu fan and rear exhaust fan
System draws 56 watts at idle.
Used 1.36 Kwh's over a 24-hour period.
Is this box ADLN (or DLNA) compatible? What makes it compatible? I heard that this is the latest in getting all your home theater components to work together. This would act as my media server which I want to connect to my playstation 3 as the player. Any thoughts?
Just curious,
egerena@gmail.com
Just built this system last week, before even reading your article. My system is:-
KPC K45 barebones
Celeron 430 1.8Ghz
2Gb Corsair DDR2 533Mhz
2 x 1TB Samsung Spinpoint F1 drives
Post a Comment