<< Read Previous Part 2 >> Read Next Part 4
Now as proud as you are of your new computer, you have to let it be while you go back to your laptop or desktop computer to create the boot drive.
All you need are 1) a 2 GB USB flash drive that you don't mind reformatting 2) the WHS Server Install DVD and 3) the KPS Shuttle drivers DVD. Many of us have a 2GB stick laying around. But if all you have are the crappy 128MB ones you get free at Staples, you can purchase one from NewEgg for around $10.
- We start by preparing a bootable USB flash drive. From Windows Vista click Start, All Programs, Accessories, right-click on Command Prompt and click Run as Administrator.
- You should see a command prompt appear.
- Type diskpart and press Enter.
- Next type each the follow commands in respective order at the "DISKPART>" command prompts. Note - this assumes that disk 2 is the USB flash drive (as it was on my system). You will need to replace the “2” in “select disk 2” with the disk number of your USB flash drive.
list disk select disk 2 clean create partition primary select partition 1 active format fs=fat32 assign exit
- My session looked like his:

- Now we will copy the files from the DVD to the USB flash drive. Select all files on the WHS DVD labeled "Server Install DVD" (press Ctrl-A) and copy them to the root of the USB flash drive. My copy took about a half hour.

- Next, we will automate the installation process. Create a file on the root of the USB flash drive named qs.ini.
- Double click on the file to edit it in notepad, paste in the following script and then save and close the file. Replace the zeros in ProductKey with the actual product key from your DVD and change the name the SERVER to anything you wish, however the name you choose must contain at least one letter and optionally numbers and a hyphen. It may not contain a space and be no longer than 15 chars.
[Q Setup] ProductKey=00000-00000-00000-00000-00000 ServerName=SERVER
- Create a new folder in the root on the USB flash drive named HSH.

- Click here to download the image and an automated install cmd file. Place the contents of the ZIP file in the folder that you just created above. Note that this step is optional an will allow you to customize your WHS Console with a KPC icon.
- Finally we will copy all machine specific drivers from the Shuttle CD. Create a new folder in the root on the USB flash drive named Shuttle.

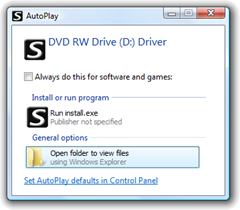
- Remove the WHS DVD and put it away (we won't need it any more) and insert the Shuttle drivers CD that came with the KPC. An AutoPlay window will appear. Select Open folders to view files.

- Select all files on the CD (press Ctrl-A) and copy them to our new Shuttle folder created above.
That's it. To recap, you should have all of the files from the WHS Server Install DVD, a qs.ini file to automate the installation, the KPC Shuttle drivers and an optional customization image with install cmd file. You now have a fully bootable Windows Home Server USB flash drive and you are ready to actually install WHS on your KPC in Part 4.


13 comments:
This was a great write-up! And the timing couldn't have been better. I had just purchased my K45 and was waiting for it to arrive when I found this.
I went about it slightly differently since I am currently USB flash drive challenged (I only have a 1gb drive). So, I copied the entire WHS dvd over to the USB drive, excluding the "RestoreCD.iso" located in the WHS folder, which is around 300mb's in size. Instead, I created a dummy file as a placeholder. After the install completed, I used a separate external drive to install the drivers.
Otherwise I followed your instructions to a "T" and all was grand!!
Thanks!
@Shad - Glad to see that the instructions worked for you. I'm currently reconfiguring my KPC with 2 x 1TB internal drives + 1 x 1TB external USB drive. You know, just for giggles. :)
That sounds awesome/expensive :). I have a 750gb as my main drive and a 500gb for my secondary. My thinking on that is having extra space on the main for the WHS OS as well as the home PC backups.
I'm blaming having two hard drives for heat inside the case that may have caused my stock CPU fan to run on high (loud!) continuously. I put in a rear exhaust fan and all is "cool" again.
@Shad - I too added a 92mm exhaust fan on the back. I'll be adding that to the post so others know about it. I hope your KPC works well for you.
Send me some pics of your KPS-WHS in it's new home if you print a custom MyKover and maybe I'll start a gallery!
Noisy, very noisy. I am happy with the setup. took me 20 mins to built, excellent guide. The only complain is noise. Is the HP this noisy? Maybe I screwed up the fan? I pushed down. Let me know
Am a Novice, but your instructions were so detailed that I tried it. Built a 1TB single disk system, for now with the upgraded CPU and memory. I plan to add a second 1TB drive (guess I should plan on a second fan also) when they fix the corruption issue. For now only using WHS for backups. I installed my evaluation software using the USB method. Have now ordered the OEM software.
Can I use the USB I already have with a new Product Key file when I reinstall?
Any other suggestions for reinstalling the OEM software.
¡Excellent! Thanks a lot, i live in Guatemala, Central America and found this site. It was great, i buy all the pices via Amazon. I build it with a Core 2 Duo 4600 procesor and a 1 TB green W.D. HD and have no problem with heat. This little box is amazing.
So far only have one problem. How to disable the keyboard check in the BIOS so you can put the box in any where like a server with no keyboard, no monitor, etc.
Thanks again.
Hey there everyone,
I'm getting this problem when trying to install the WHS on my server.
(0x00000002, Parameter2, Parameter3, Parameter4):
This error is defined as ACPI root PCI resource failure. To discover what current resources are being used by PCI devices, ACPI must be able to query the CRS descriptor in the ACPI namespace. This error occurs if the BIOS lacks a pointer to the list, or if the list is empty, or if the list contains errors or conflicts.
http://support.microsoft.com/kb/314830
My hardware is a Via Epia Pico-ITX motherboard with a WD 320 Sata HDD and 1 GB of memory.
I'm using the USB stitck setup posted here and no luck.
Did anyone seen this before? Or can give me any clues on what is going on?
I am running windows XP and dont have vista .. Run doesnt seem to have an admin option and I have admin priveleges
When I do list disk with Diskpart it doesnt find the USB key ????
I used the HP uitility to format the drive - is that the same or should there be some files on the key after formatting
Also silly question - are you saying dont need to use the thermal compound at all
@Subo: I fought with that exact same issue last night for a couple hours before giving up. The diskpart in XP (v. 5.1) does not recognize removable flash drives the way diskpart in Vista (v. 6.0) does. I tried everything to make a bootable USB Flash drive and gave up.
I ended up using a USB Disk Drive instead (non-flash), which XP recognized (although I was not able to format it in Diskpart XP), and assigned it a drive letter, which is the key.
After copying all the files, the Shuttle recognized it and all was good.
The easiest thing however, would have been to find someone with a Vista Machine. The same process on Vista took about 10 minutes this morning....
I have to echo everyone else and say wonderful writeup. I am in the middle of the install now and can't get the list disk command to recognize my flash drive. Any suggestions? Going to poke around but will check back to see if you are able to help.
Many thanks!
Of course after posting I see the comments with my problem.
@vansmack - thanks for your post. I will be heading out and picking up a drive, not a flash, tomorrow.
After running my Shuttle computer for about a year, I suddenly lost my connection to WHS. I determined the problem was with the Shuttle. Cheapest solution seemed to buy another Bare Bones Computer and rebuild using original components. Did not reload the software since it seemed to boot properly from Original Hard Drive. The WHS is on the network and I can access files on the server from my network places but none of my computers can connect via the Home Server Connector. Troubleshooter shows the following errors:
Cannot connect to the server transport
Cannot connect to the server backup
UPnP discovery failed
Name resolution failed
Windows Home Server Beacon discovery failed
Should I have reloaded the software using the original 2GB Flash (which I still have) Have updated the software since originally loading in May 2008
Post a Comment