Stuff to pimp your Windows Home Server

Hacking Windows Home Server is a blog dedicated to Microsoft's WHS technology. Brought to you by Donavon West, Microsoft MVP and author of LiveGadgets.net and donavon.com I'll also discuss the Hewlett-Packard HP MediaSmart Server EX470, EX475, EX485, EX487, the T7-HSA Tranquil Harmony Home Server and any other new Home Server hardware platforms that arise. You can also call this hacking or hackz. In any case I will show you some cool things to make your Microsoft Windows Home Server even sweeter.

A blog devoted to getting the most out of your
Windows Home Server by Microsoft MVP Donavon West.
Showing posts with label nofeed. Show all posts

Monday, April 21, 2008

Build a Green $400 Windows Home Server - Part 2: Assembling the Barebones System

<< Read Previous Part 1 >> Read Next Part 3

In the Part 1 of this series we talked about the required parts to build a low cost, green, $400 Windows Home Server based on the Shuttle KPC. In Part 2 we will show you step-by-step how it all comes together.

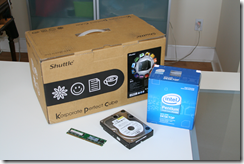
  1. Here is a list of everything we will be using.
    1. Shuttle KPC
    2. Intel Pentium E2160 1.8GHz Dual Core
    3. WD 500GB hard drive
    4. Kingston 512MB Memory
    image
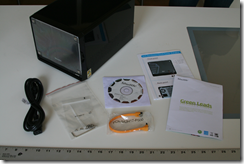
  2. Here's what you will find when you unbox the Shuttle KPC box. image
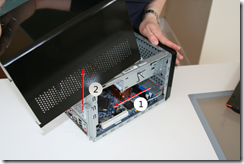
  3. Unscrew the 3 tool-less thumbscrews on the back of the KPC. image
  4. Remove the cover by sliding the cover back on the case and then upwards. image
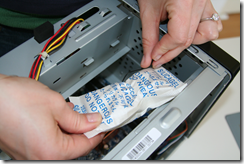
  5. Remove and discard the silica packet that is twist tied in the drive bay. image
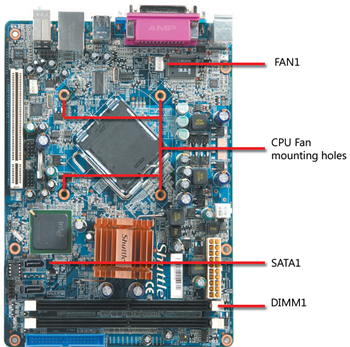
  6. Please take a moment to familiarize yourself with the KPC motherboard and the connectors that we will be using in this project. image
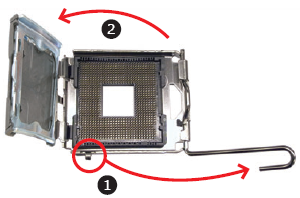
  7. Before removing CPU from box, prepare the socket. First unlock and raise the socket lever, then lift the metal load plate on the CPU socket. image
  8. Move the power supply cords out of the main cavity, out of your way.
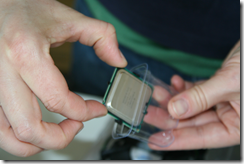
  9. Carefully remove CPU from box, holding at the edges. DO NOT TOUCH THE METAL TOP OF THE PROCESSOR. From now until you install it, only hold the CPU from edges. It is important that you don't get any oils from your fingers on this surface. image
  10. Carefully remove and discard the black plastic protective cover from the bottom surface. image
  11. Now that the pads are exposed, DO NOT TOUCH THE BOTTOM SURFACE. Just hold from edges and your processor will be clean and happy. Don't you want that?
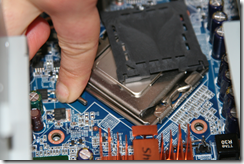
  12. Set the fan aside. DO NOT TOUCH THE BOTTOM OF THE FAN, the part with the gray gooey stuff. (Eventually, the top of the processor and the bottom of the fan will be touching each other and we don't want any finger residue on either side.)
  13. Now is the time where barebone PC purists will tell you to clean and remove the factory fan goo in preparation for using a quality thermal paste like Arctic Silver 5 Thermal Compound. As much of a purist as I tend to be, even in this case, as this is a low power processor and hobbyist project, we didn't feel it was necessary. But feel free to do so if you know what you are doing.
  14. Install CPU - You can approach either from the top or side opening. Unlike other processors, this one has no pins, just pads. Therefore, it is easier to drop in because there is less risk of severely maiming it. Now, orient the CPU with the socket, aligning the yellow triangle on the corner of the CPU with the notched corner of the socket (closest to the copper colored heat sink). Carefully lower into place. image
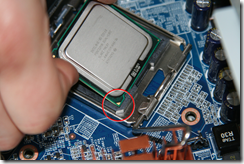
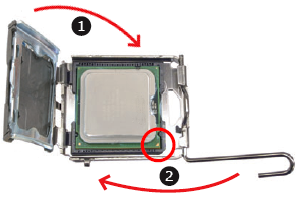
  15. Close the load plate (step 1 in figure below). It just lowers and lays flat, no snapping into place. Lower the CPU socket lever (step 2 in figure below). There WILL be some resistance as you push down (it is NOT futile) and then lock in place. There is a chance that the black plastic cover on the load plate will pop off as you are closing the lever. As you can see in the photo, this happened to us as we were installing. The next step is to remove it anyway, so it's ok. image image
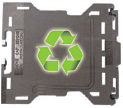
  16. If it didn't pop off in the last step, remove the protective socket cover (again being sure not to touch the top of the processor) and discard or, as this is a green PC, recycle. image
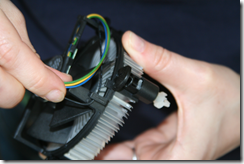
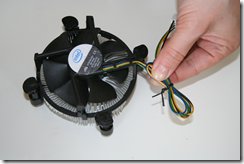
  17. Prepare fan for installation. First, the wire for the fan included with the processor is very long and is wrapped around the edge of the fan and fitted into two little clamps. There is a risk of the wires getting caught in the fan, so we prefer to remove the wire from the two clamps and bundle it. Luckily, we have a twist tie from removing the silica packet, so we just used that and trimmed the excess. Otherwise, you could use one of the small zip strips that come in the plastic bag of goodies included with the shuttle. image image
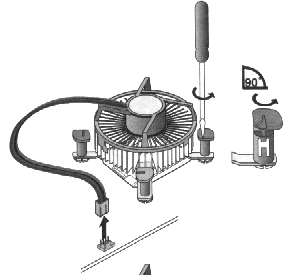
  18. Install fan. Notice that the 4 pins at the corners of the fan pop in to the 4 mounting holes. Also notice that the fan connector plugs in to the motherboard where it is marked "FAN 1" (see photo in step 6). So, orient the fan so as to minimize the cord distance between the connector and plug. Now go ahead and rest the pins in the holes and make sure they are really lined up.
  19. Approaching from either side, use both thumbs at once to press down on the two pins at opposite corners. Then press in the other two pins at the same time. image
  20. Troubleshooting note - First, we tried pressing one pin at a time and it ruined the alignment enough that we just couldn't press in the final pin. This glitch taught us 1) that two at a time is better and 2) how to undo the pins if you need to start from scratch. Notice the arrows embossed on the black plastic top of the pins. We used a small screwdriver to unscrew the pin in the direction of the arrow, which allowed it to pop back out. Turn the pins 90% back to the original position before trying again. image
  21. Plug in the fan connector. There isn't a lot of room inside this computer (which we like because that makes it nice and small) so it can be hard to see what you are doing. For this step, it is easiest to reach in through the top opening while looking in through the power supply side opening. This gives the best view of the prongs and made it easy to line them up. image
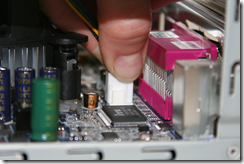
  22. Next we will install the memory. If you are installing a single 512KB stick, you must place it in the slot marked DIMM1 (which will be towards the rear of the computer). If you are installing 2 sticks of 1GB memory, you will place one stick into DIMM1 and one stick into DIMM2. The ejection levers (white in the picture below) should be facing out when you get the motherboard (if not, flip them outwards) and they will automatically close around the memory when you snap it in. The memory is keyed so that it will go in only one way. It should make a "snap" noise if it is properly seated. image
  23. Now its time to install the hard drive. We will be installing only one drive right now. The other optional drive will be installed after we have the system fully operational.
  24. Take the drive that you would like to use as a system drive and place it in the lower drive bay. Secure it to the chassis with 4 screws (2 on each side). Note that it's really not necessary to secure the drive on both sides but doing so will cut down on vibration and thus noise level. image
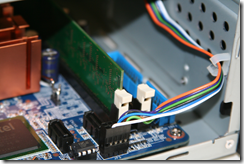
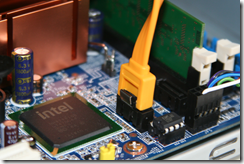
  25. Attach the L-shaped end of the orange SATA data cable (that came with the KPC) to the back of the drive. It should snap into place as it has a retaining clip. image
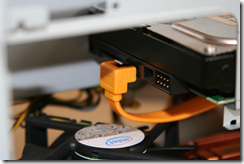
  26. Attach the other end of the SATA data cable to the motherboard in the connector marked SATA1. Again it will snap into place. image
  27. Be sure that the cable has enough clearance to stay away from the spinning CPU fan.
  28. Plug in the power cord and attach it to the back your KPC.

You have just completed the basic barebones computer! As we don't have any boot devices, nothing will happen yet. You are now ready for Part 3, where we install WHS onto our newly assembled computer.

<< Read Previous Part 1 >> Read Next Part 3

Read the entire post, Leave a comment and More...
2 comments (so far). go ahead and add to the noise.

Build a Green $400 Windows Home Server - Part 3: Creating a bootable Windows Home Server USB Flash Drive

<< Read Previous Part 2 >> Read Next Part 4

Now as proud as you are of your new computer, you have to let it be while you go back to your laptop or desktop computer to create the boot drive.

All you need are 1) a 2 GB USB flash drive that you don't mind reformatting 2) the WHS Server Install DVD and 3) the KPS Shuttle drivers DVD. Many of us have a 2GB stick laying around. But if all you have are the crappy 128MB ones you get free at Staples, you can purchase one from NewEgg for around $10.

  1. We start by preparing a bootable USB flash drive. From Windows Vista click Start, All Programs, Accessories, right-click on Command Prompt and click Run as Administrator.
  2. You should see a command prompt appear.
  3. Type diskpart and press Enter.
  4. Next type each the follow commands in respective order at the "DISKPART>" command prompts. Note - this assumes that disk 2 is the USB flash drive (as it was on my system). You will need to replace the “2” in “select disk 2” with the disk number of your USB flash drive.
    list disk select disk 2 clean create partition primary select partition 1 active format fs=fat32 assign exit
  5. My session looked like his: Preparing the USB flash drive
  6. Now we will copy the files from the DVD to the USB flash drive. Select all files on the WHS DVD labeled "Server Install DVD" (press Ctrl-A) and copy them to the root of the USB flash drive. My copy took about a half hour. image
  7. Next, we will automate the installation process. Create a file on the root of the USB flash drive named qs.ini.
  8. Double click on the file to edit it in notepad, paste in the following script and then save and close the file. Replace the zeros in ProductKey with the actual product key from your DVD and change the name the SERVER to anything you wish, however the name you choose must contain at least one letter and optionally numbers and a hyphen. It may not contain a space and be no longer than 15 chars.
    [Q Setup] ProductKey=00000-00000-00000-00000-00000 ServerName=SERVER
  9. Create a new folder in the root on the USB flash drive named HSH. image
  10. Click here to download the image and an automated install cmd file. Place the contents of the ZIP file in the folder that you just created above. Note that this step is optional an will allow you to customize your WHS Console with a KPC icon.
  11. Finally we will copy all machine specific drivers from the Shuttle CD. Create a new folder in the root on the USB flash drive named Shuttle. image
  12. Remove the WHS DVD and put it away (we won't need it any more) and insert the Shuttle drivers CD that came with the KPC. An AutoPlay window will appear. Select Open folders to view files. image
  13. Select all files on the CD (press Ctrl-A) and copy them to our new Shuttle folder created above.

That's it. To recap, you should have all of the files from the WHS Server Install DVD, a qs.ini file to automate the installation, the KPC Shuttle drivers and an optional customization image with install cmd file. You now have a fully bootable Windows Home Server USB flash drive and you are ready to actually install WHS on your KPC in Part 4.

<< Read Previous Part 2 >> Read Next Part 4

Read the entire post, Leave a comment and More...
13 comments (so far). go ahead and add to the noise.

Build a Green $400 Windows Home Server - Part 4: Installing Windows Home Server from the USB Flash Drive

<< Read Previous Part 3       >> Read Next Part 5

In Part 3 we prepared a bootable USB flash drive with Windows Home Server. In this part we will show you how to setup the BIOS and install WHS from the USB flash drive. We suggest that you read through the instructions fully before you start. If that is too much to ask, at least read through each step fully before you do it as there are important caveats and tips included that will make or break the installation.

  1. First, plug in a mouse, keyboard and monitor into the appropriate inputs at the back of the KPC Shuttle. Power on your monitor.
  2. Make sure that the KPC is powered OFF. Seriously, make sure it is off and THEN place the bootable USB flash drive into one of the USB ports on the back of the KPC. THE FLASH DRIVE MUST STAY PLUGGED IN TO THE SYSTEM UNTIL THE INSTALLATION IS COMPLETE. Do not remove the flash drive until instructed to do so! (step 31) Removing it prematurely can cause real problems with your installation.
  3. Press the power button on the front on the KPC unit to turn it on.
  4. As this is the first time you have booted the KPC since adding a processor, there are a few different screens that may appear. No matter what you see, press the DEL key repeatedly to the enter the BIOS setup. I ran this installation a number of times and found that a few things could happen - the BIOS may complain about 1) a CMOS checksum error, or 2) a new processor error. Or you may simply see the Shuttle logo screen. Here are a couple of screen shots that I saw during my test runs. Again, it really doesn't matter which screen you get, we just want to get into the BIO setup so as soon as you see "life" press the DEL key repeatedly within 3-5 seconds. If for some reason you  miss the window for entering the BIOS setup within the first 5-10 seconds of "life", there are a variety of things that will happen. It doesn't matter what happens, once you miss the BIOS setup you will have to power the KPC off and on to try to get into BIOS again.
    image  image 
  5. Steps 5-8 show how to prioritize the USB flash drive as the boot up disk in the BIOS setup. Once in the BIOS setup, with the arrow keys, position the cursor to Load Optimized Defaults and press Enter. You will see a confirmation box appear. Press Y (yes) and press Enter. 
    image  image
  6. Now cursor to Advanced BIOS Features and press Enter.
    image
  7. As the USB flash drive appears to BIOS as a hard drive, we want to make sure it boots before our real hard drive. Cursor to Hard Disk Boot Priority and press Enter.
    image 
  8. Locate the USB flash drive and click the plus key to move it to the top of the list.
    image
  9. Once we are done with installation, this will be a "headless" server (i.e. without a keyboard, mouse or monitor), so we need to disable the BIOS setting "Halt on Error". Steps 10-12 explain how to make this change.
  10. Press ESC twice until you are back on the main BIOS setup screen.
  11. Cursor to Standard CMOS Features and press Enter.
    image
  12. Make sure that Halt On is set to No Errors. If not, press Enter on the current value, cursor to No Errors and press Enter.
    image image
  13. Finally press F10 to save these new settings and exit.
    image
  14. As soon as you exit, the system will reboot. You HAVE to watch this process, even though it takes a while. (I know it's like watching paint dry, but you really have to sit and watch this. Think of it this way - you are watching your WHS being born. It's exciting!) You should see the logo screen appear, followed by "Verifying DMI Pool Data...", "Windows is loading files..." (screen shot 1) and "Setup is initializing..." (screen shot 2). Eventually it will enter a Windows Home Server setup screen which you have to watch as it takes several minutes to format the system drive and copy system and installation files.
    1) image   2) image 
    THE MAIN THING YOU ARE WATCHING FOR is the "Rebooting the OS" notice (screen shot 3). Watch the progress bar at the bottom because right after this message, WHEN THE COMPUTER STARTS TO REBOOT, PRESS DEL REPEATEDLY TO ENTER THE BIOS SETUP
    3) image <---LOOK FOR THIS!
    If you miss the "Rebooting the OS" message and it reboots without your pressing DEL to enter the BIOS, the installation procedure will repeat from (logo screen, "Verifying DMI Pool Data", etc.) and you will have another chance to enter the BIOS during reboot. It will just keep repeating the installation until you press DEL during reboot.
  15. Now that we are in the BIOS setup, we need to change the hard disk boot priority back, raising the system hard drive to the top.
  16. As before, cursor to Hard Disk Boot Priority and press Enter.
  17. This time locate your system hard drive and click the plus key to move it to the top of the list.
  18. Again, press F10 to save and reboot.
  19. Everything else for the next 50 minutes or so is automatic. The system will reboot a half a dozen times or so during this time.
  20. Eventually, you will see this screen. Click the arrow next to "Welcome".
    image37_thumb[1]
  21. Now enter a password (this will be your Administrator password).image40_thumb[1]
  22. Enter your preferences for the next few screens and you finally will see this message.
    image52_thumb[1]
  23. BUT WAIT. Before we can log off, we must install the LAN driver.
  24. Bring up Windows Explorer and open the USB flash drive. Open the Shuttle folder and double click on install.exe.
  25. Click on Install Motherboard Drivers, then on Install Marvell Gigabit LAN Driver. You have to reboot the KPC like you normally would (from the Start menu).
    image 
  26. Log into WHS as Administrator with the password you setup previously.
  27. Run Shuttle install.exe again. This time click on Install Intel Chipset Driver. You will be prompted to reboot but DON'T. Instead, go on to the next step.
  28. There is one last optional step. The WHS Console allows OEMs to customize the icon on the Settings, Resources dialog. Open the USB flash drive and navigate to the HSH folder. Double click on the file ServerImage.cmd to copy the file. Note: Do not have the WHS Console open at the time you run ServerImage.cmd or you will get an error.
    image
  29. Shut down the system.
  30. You may NOW remove the flash drive! Also, disconnect the keyboard, monitor and mouse. We are done with these components so you can return them to their original home.
  31. While you are now done with the custom installation of your KPC (and you should be very happy), there is still network setup to complete on your HOME computer. Simply power on the KPC and proceed to Step 3:Install the WHS Connector Software of the Windows Home Server Getting Started Guide that came with the OEM install DVD.

Congratulations! Your KPC Shuttle based Home Server is ready for action. Proceed to Part 5 for the last fun step - learn how to "kustomize" the front panel of your new machine.

<< Read Previous Part 3       >> Read Next Part 5

Read the entire post, Leave a comment and More...
14 comments (so far). go ahead and add to the noise.

Build a Green $400 Windows Home Server - Part 5: Make it Your Own

<< Read Previous Part 4

So there you have it. A $400 Windows Home Server that's green enough, small enough, light enough and quiet enough to sit in the corner of your living room, kitchen or just about anywhere. Please forgive the cheesy prop laden photos below.

Home Server Hacks custom KPC in the Kitchen  image  

Kustomize

imageBut why stop there? With the KPC, you can "kustomize" your home server with removable MyKover front panel that works just like a photo frame. Simply replace the image or photo to change the look. You can download one of the pre-made panels from Shuttle's Gallery (sample shown above/right) or create your own.

Of course, now that you are an official Home Server Hacks expert, we recommend you show your pride with our custom Home Server Hacks MyKovers. On the other hand, if you are a political junkie you can dress up your KPC and support your candidate for president at the same time. Just click on a thumbnail below to download:

Download the HSH MyKover  Download the WHS MyKover  

Download the Obama MyKover  Download the Hillary MyKover  Download the McCain MyKover 

More Information on the Shuttle KPC

Here are some links to the global KPC website.

Final thoughts: My dream KPC system

I put together the most basic KPC system possible in this article (to keep the price low), but in part 1 I listed an optional shopping list. If you have a little left over from April 15th and want to build up a "dream system" then here is what I would do.

  1. I would definitely go for the dual core (as I did here). The single core will be fine for moving files around, the the second core will give you some extra power if you want to stream music, etc.
  2. Go BIG! Instead of a single 500 GB hard drive, build up a system with 2 x 1 TB drives. Remember to order the SATA Data & Power combo cable. The KPC is a perfect application for this handy cable.
  3. Add a third external USB 1 TB drive for a total of 3 TB.
  4. And I would definitely upgrade to 2 GB of RAM.

So, congratulations to all of you for making it this far! Good luck and I hope you have as much fun as we did and learned a little along the way. Can't wait to hear from you about how your systems come out!

<< Read Previous Part 4

Read the entire post, Leave a comment and More...
34 comments (so far). go ahead and add to the noise.